All posts by dicey1408

About dicey1408

I'm a music/history teacher during the day, and crafter at home. In 2012 I aimed to make all the presents we gave at Christmas. I almost made it!! As the year has progressed I have made birthday, mothers and fathers day presents and am now attacking christmas again. To add a small complication in managing my time I had my first baby in July 2013. In this blog I want to show the presents I am making, and include the odd tutorial. I do not pretend to be an expert at any of this and expect many will see easier routes to getting things done! I also use magazines and books a lot for ideas/patterns and therefore will point you in the direction of instructions for those parts, as I do not want to tred on the toes of the people who give me inspiration.

Crochet Cowls Christmas Combo!

Ok, so the first presents of the year fit every criteria I had:

1. I can make them for under £5 – the present I find the hardest to do!

2. It uses my new (unaccomplished) crocheting skills

3. The tutorial says it takes an hour (it actually took me about 3 each, but I did have to undo mistakes etc – I’m really not great.)

The tutorial for these cowls came from pinterest and a blog by Fynes Designs. It was very simple to follow (thank you!) and very easy to make. It was really satisfying to see the present grow so quickly (as opposed to my current knitting projects!)

I decided to just join them rather than try and sew on buttons too, but I do think her button idea is a great one too. I made one for my sister, and one for my sister-in-law. I don’t know why I keep making them both so similar presents – I think it’s just because they both like similar comforts! 🙂

Here are my attemps – I’m rather chuffed with them 😀

Ben's Iphone 123

Christmas planning

In my husband’s family they do 3 presents per person for Christmas – a £5, a £10 and then a big present. It was started when my hubby started uni, and has continued ever since. It’s great. We get imaginative and interesting presents for each other, without completely destroying the bank balance. As such I’ve also started doing something similar with my close family too. I hate the commercialism of chrismas where you get a box with not a lot inside. On such a small scale budget wise as well you really have to be imaginative. Therefore we have 2 plans, make as much as we can, and scour vintage, antique fairs, charity shops and any other odd place we can think of for unusual but appropriate gifts.

Whenever I start planning presents I do two things – 1 look through my secret pinterest board that I pin anything that I think will make a good present throughout the year. I also go through my craft magazines from the year, and my note book where I scribble ideas down.


After last christmas I decided to try and learn how to crochet. Within the year I have learnt to chain, single crochet and double crochet. Not exactly going to make it as master of the year! My issue is I just can’t focus on any one craft for long, I currently have 2 jumpers and a cushion in the process of being knitted, a tapestry on the go, plus a desk full of partially started christmas presents, and a huge wicker basket hiding all the other projects/fabric stash. I think my husband does genuinely dispair of me! Therefore my presents this year need to be quick to make (preferbly within 3/4 baby nap times) or late in the evenings after my marking is done!


So notepad is out at the ready, and planning is underway… what crafts will this year bring?!

Kimono from a scarf

I am an avid follower of pinterest… it is just the best! Anyway, I was looking for another present for my sister, this time for her forthcoming birthday. As it is the six week holidays I wanted to make her something, but also have half a mind on Christmas as well (I know it’s 4 months away, but being a musician/teacher December is just crazy with concerts so might as well write that off from the outset!)


Anyway, whilst browsing I saw this fabulous tutorial on how to create a kimono from a scarf on a site called House of Earnest. The link to the tutorial is here:

http://www.houseofearnest.com/diy-fringed-kimono/


I am a real lover of upcycling, so then came the hunt for a scarf. My sister loves the colour blue, but also wears a lot of brown and beiges. Her birthday being September I thought sticking to her favourite autumnal colours could be good. Whilst meandering around Chelmsford with my Mum for a day I found a gorgeous, wool content scarf in a charity shop. Bonus! It’s cheap enough that if I muck it up I won’t be worried, and gives some good to someone else as well as fitting with my upcycling theme.


I followed the tutorial and found it so very easy to follow. My only disappointment with it, is because of the lightweight nature of the fabric the neck line droops a little. I do think, however, that my sister in law would like one of these too, so I’m going to make another (I already have a light blue pashmina ready for the project) for her birthday in January. I might have a look for a pattern from one of my many dress making books (if only I had the confidence to have a go at all the pretty clothes!) to get a better neck line rather than my slightly dodgy drafting. If you have a go do share your pictures in the comments section, I love seeing variations of simple projects.

Finally big thank you to House of Earnest for such a great (and easy to follow) to tutorial!

Ben's Iphone 125 Ben's Iphone 124

Finishing the Monopoly set

So it’s taken me rather a long time to come back and do this – sorry! My little bubba and work just take up so much time!


Anyway, I framed the monopoly board in a square frame with a plastic rather than glass frontage. This has meant we could play the game in the frame without horrible die on glass clunking noise.

Next came the rest of the set. I made monopoly cards on word creating a grid template and using colour blocks. I downloaded Harry Potter fonts I found from a link on pinterest to write these in. I changed the denominations to galleons, but kept the amounts the same (except for one error on the Chamber of Secrets, which my sister is so in love with we have left as a ‘deliberate’ error! Apparently you should be charged more there!) The money I googled for the original templates, and then replace the two usual images with a broomstick and a wizard hat. That took some time to get right, and then to print and cut them all out! Finally I made ‘Daily Prophet’ cards instead of Community Chest, and ‘The Quibbler’ instead of Chance. I re-wrote the messages into things that would be wizard like, so instead of hospital fees she had St Mungo fees, Broom stick repairs etc! That was quite a bit of fun. If you would like my word documents for the property cards, money etc do message me with an e-mail address, I will happily share, however, I do not hold any copyrights, this is purely for personal/family purposes and not for profit etc. I don’t want to start getting into trouble with Warner Bros, J.K. Rowling or Hasbro – I like them all to much!

20131120_093709 20131120_093503 20131120_093511 20131120_093517 20131120_093524 20131120_093626 20131120_093633 20131120_093657

To keep all the cards safe I found a copy of Prisoner of Azkaban that was falling apart in a charity shop. I ripped out pages (I know, I know, it felt very strange to start with!) and made wonky envelopes for the cards to go in. I also made a sleeve to hold the money together.


I tried to make playing pieces and houses out of clay, but hit several problems. The first is my inability to model well, the second was the fact that things kept falling apart, the third was time – I still had about 15 presents to make and was sat getting frustrated at a monopoly set! So I cheated at this point. Out of an old incomplete set I had picked up at a bootfair for crafting purposes I took the playing pieces, die, and houses/hotels. I did get a nice organza bag to put them in (saved from a present I’d been given earlier in the year – my thriftyness knows no bounds!)


Finally I needed to think of a way to present this all together, as obviously the board in a frame was not going to fit in a box etc, but all the rest needed to be kept nicely together. Whilst meandering around hobbycraft with bubba (the bright colours kept her amused and gave me a little mental stimulation break whilst on maternity leave!) I saw they had cardboard forms that you could decoupage, one of which was in the shape of an old fashioned hard back book (with the ridges on the spine etc). It was perfect. I bought it and spent the next few nap times happily modge podging more of the Prisoner of Azkaban book pages on to it, saving the title page for the front, and chapter headings for key places around it. I covered all the outside and inside, let it dry and then voila I had a great way to give my sister her present. To hold the book shut I raided my hoarding box again and found the left over of a thin leather strap from a present made earlier in the year. I wound it round and sat back and smiled. Present made! 🙂

My first tutorial – Potteropoly – the board

Hi all, thanks for coming to my blog and my first post. This is set up because
I posted a question on the Facebook page Craftaholics Anonymous about this project and got an overwhelming response of people wanting to see the results and have a tutorial. (BTW if you’ve not looked at the Craftaholics Anonymous page yet, do! It’s fascinating and soooo helpful!)

Ok so down to business. As part of my ‘make everyone their Christmas presents’ plan for 2013 I wanted to make something with a Harry Potter theme for my big sister. Last year I made her a set of school robes from a free tutorial online. This year I decided to mix it with another of her fascinations – Monopoly. I discovered there was no offcial set so I went about researching what other people had done in making their own sets. I will freely admit I’ve pinched ideas, and for the life of me I won’t be able to attribute every one of them as half my research is done whilst breastfeeding and following random links! If you see your ideas here and I have linked you in I appologise. At present this is very much a project in the making and so today I will just deal with the board.

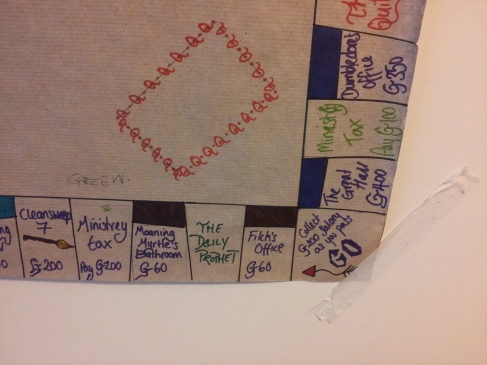
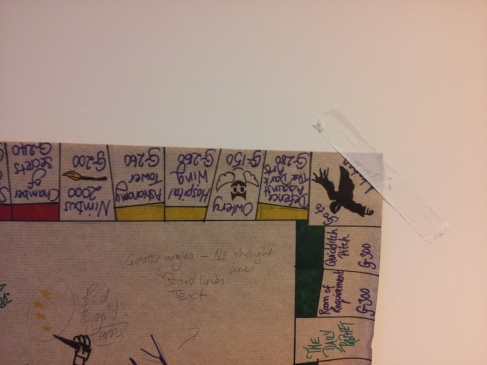
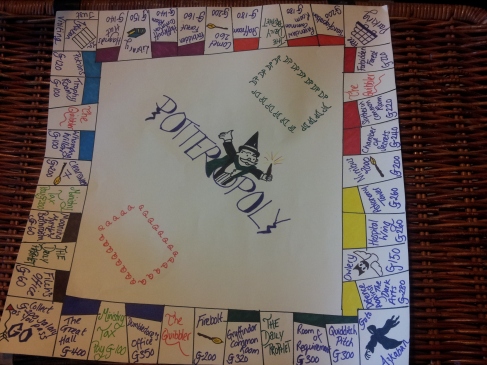
The first think I needed to tackle was the places on the board. I did think about doing random places from all the books, but when I started to try and lay the board out it just became too random. I had shops linked with key places in Hogwarts and it just didn’t work. So then I decided to limit it to places within Hogwarts itself. Instead of train stations I decided to do 4 different broomsticks, and as utilities the Owlery and Library.

To see how it would work I got some brown parcel paper (always have a supply for making templates/patterns and for wrapping presents) and drew around a real monopoly board. I then measure and marked on the squares and started to add the place names. It all looked to much like the original and not mad enough (if there is one thing about the Wizard world, it is that it is wonky and crazy, not straight and perfect) so as I drew over my pencil markings with my Sharpies I started to add slighly wonky lines. Below is the picture of the paper template board:

Image

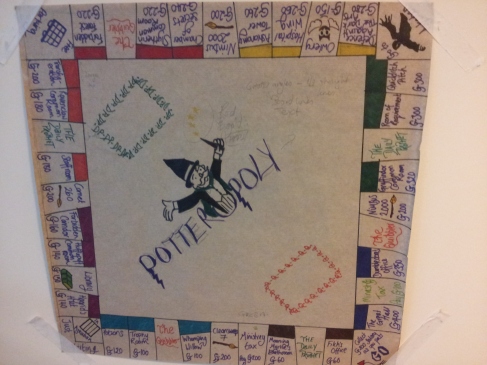
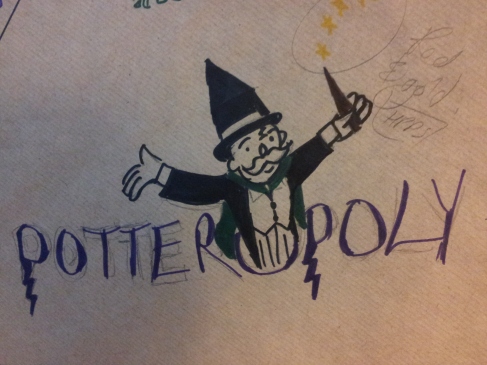
As you can see I taped it tothe wall so that I could use it as a basis for the next one. The idea of using ‘The Quibbler’ and ‘The Daily Planet’ as chance and community chest cards came from someone elses set. As does the image from free parking – I thought it so cute I tried to draw my version of theirs. The owl image also comes from the internet. In another post I saw someone had given the monopoly man a scar, which I thought was a stroke of genius! At first I gave him the traditional top hat, but as my husband pointed out a wizard’s hat would be much more apt.

ImageImage

ImageImage


So from this I decided a few changes needed to be made. The wonky element was just not wonky enough. It looked accidental in places and therefore did not give the mood I wanted. Also I could not fit all the titles in. I realised I could plan the wonky elements to help fit in the longer place names. I did at this point consider computer generating the real board, but thought that it would add more to it if it were hand made, more ‘magical’ in style. Also I don’t have a big enough printer so it would look odd in small parts.

Other changes were to make the sparks out of the Monopoly guy’s wand to red and gold shoots rather than stars, as mentioned in the Philosopher’s Stone when Harry buys his wand. I felt the title was too far over to the left of the board. Also to make ministry tax squares green, to break up all the purple text. Finally I realised I needed to rub out the pencil markings before colouring in squares, as the sharpies go over the top of the pencil line and then you can’t remove it, making it look very amateur.

The next step was to make the board itself. I got parchment coloured card from my local hobbycraft (an expensive shop, but convinient as it’s just down the road and it does a little of everything!) and again drew out the squares as measured on the original monopoly board. Then I added my wonky lines and rubbed out the pencil markings. Before doing all the squares writing/colouring in I decided to tackle the drawing elements, starting with the Potteropoly sign as I knew these would be the bits that could go drastically wrong! Luckily they didn’t. Overall I was really happy with the new board. It’s not perfect, but nothing by hand ever is, and I feel it adds to its charm.

Image

My next issue was that the board would be vulnerable to damage (just trying to keep it in the house with all the baby stuff showed me how easily it could be damaged). This was the point I posted on the facebook group and realised peeps might actually be interested in a blog on this! My initial idea was to back it on felt and then modge podge the top. I’d never done either of these things before so wanted to ask advice before I wreck all my hard work. The best suggestions I got were:

1. Frame it – then it will keep it safe and a piece of art between games

2.Take it to the local print shop to get mounted/protected.

So these are my next two steps to investigate. It really depends on how much it costs. Not trying to be a cheapskate, and I love my sister very much, but on maternity pay with a 3 month old baby has really limited the budget for this christmas. Most of our ‘spare’ money will go on the fuel to see our family, so this really does need to be budget led.

So watch this space. There is still to come…

1. What will I do with the board?

2. Making ‘The Quibbler’ and ‘The Daily Prophet’ cards

3. Making the property cards

4. Creating the playing pieces

5. How to present it as a present…

I hope you’ve enjoyed my blog so far and that you’ll come back to see the rest of this project. I’ll also try to add blogs of other presents I’ve made/going to make as I go along, mostly when my little one is asleep!